December 4, 2024 at 6:15 PM PST
Cooking Holiday Hosting gingerbread house
Upgrading Your Gingerbread House This Christmas
Whether you're a novice at baking gingerbread houses or baked a few already, here are tips to make them even better.
Cooking Holiday Hosting gingerbread house
Upgrading Your Gingerbread House This Christmas
Whether you're a novice at baking gingerbread houses or baked a few already, here are tips to make them even better.
December 4, 2024 at 6:15 PM PST
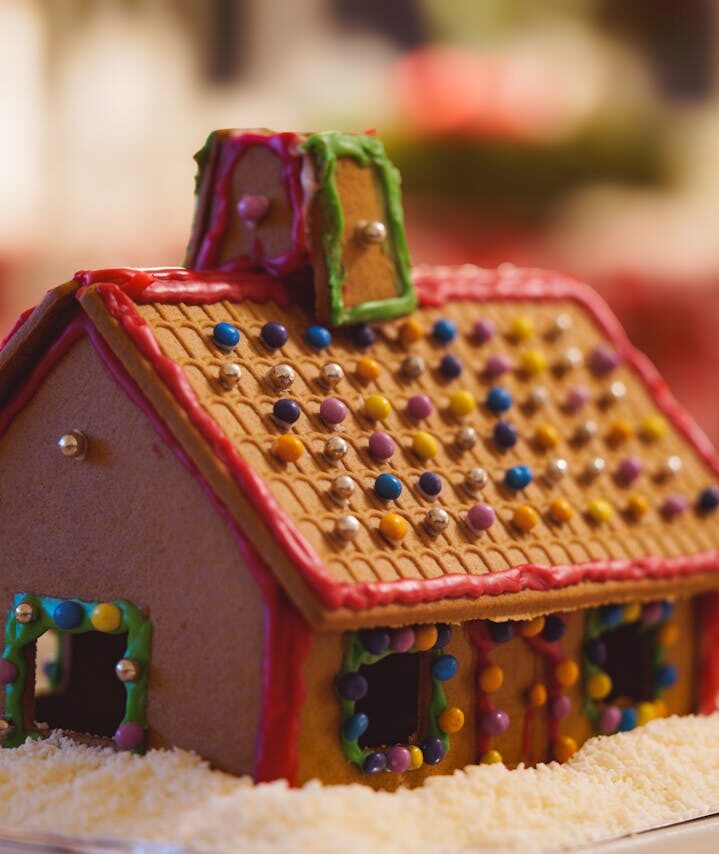
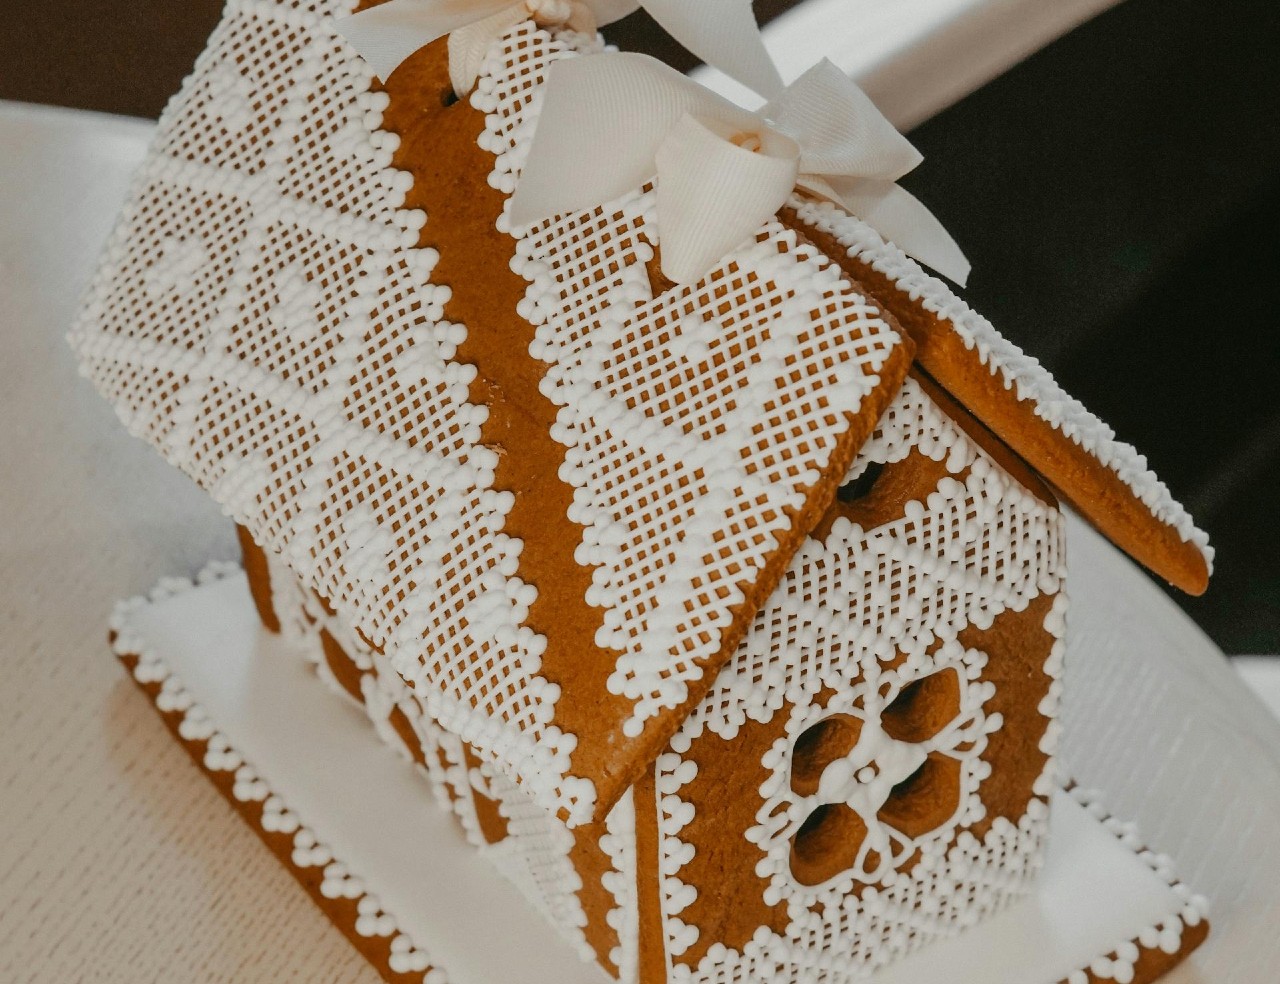
Whether you were a Girl Scout who was staring at that gingerbread-house-building patch, a novice adult baker who wanted to show out at the next holiday party or baking is your longtime hobby, somewhere along the line, you’ve seen this impressive baked dish. If there was one at your Christmas potluck, you probably tsk tsk tsked at the first co-worker to suggest eating it. Why couldn’t everybody just eat Christmas cookies and let that house sit pretty on the holiday table?
And how did the baker keep the doors from falling down, keep the windows in place, avoid the roof from falling in and deal with that tricky chimney? No worries. You’re about to find out how to make gingerbread houses (and how to improve them too).
Ingredients for a Dairy Gingerbread House (and a Vegan Gingerbread House)
- 3 cups of all-purpose flour (or 3 cups of blanched, very finely ground almond flour)
- 1/4 teaspoon of baking soda
- 2 teaspoons of ground ginger
- 2 teaspoons of ground cinnamon
- 1/2 teaspoon of ground allspice
- 1/4 teaspoon of Morton’s Lite Salt (or another lite salt variation for family members with high-blood pressure)
- 6 tablespoons of unsalted butter (or vegan butter)
- 3/4 cup of packed light or dark brown sugar
- 1 large egg (or any of these vegan egg substitutes)
- 1/2 cup of dark molasses (or beet sugar, if you want to avoid cow bone char that is common in molasses)
- 1 tablespoon of water
- Icing of your choice
- Candies of your choice
(Optional) Vegan Icing Ingredients
- 1 cup of vegan butter
- 3 cups of powdered sugar
- 3 tablespoons of non-dairy milk
- 1 teaspoon of pure vanilla extract
Buttercream Icing for Decorations
- 1/2 cup of shortening
- 1/2 cup of unsalted butter (or vegan butter)
- 4 cups of confectioners sugar
- 2 tablespoons of milk (or plant-based milk)
- 1/4 teaspoon of pure vanilla extract
- 1/8 teaspoon of lite salt
Directions for Building a Gingerbread House
- Whisk the flour, baking soda, ginger, cinnamon, allspice and salt in a large bowl.
- With a mixer, beat the butter and brown sugar together on medium speed until smooth and creamy.
- Mix the egg, molasses and water on high speed. Scrape down the sides and up the bottom of the bowl, and beat the cookie dough mixture again until combined.
- Slowly mix the dry ingredients into the wet ingredients until combined.
- (Optional) Divide cookie dough in half, and wrap each tightly in plastic wrap anywhere from two hours up to three days.
- Preheat the oven to 350 degrees Fahrenheit.
- Line two or three large baking sheets with parchment paper. (Or, use silicone baking mats.)
- Remove cookie dough from the refrigerator, sprinkle a little flour on top and roll the mixture to approximately 1/4 inches thick between two pieces of parchment paper. (Note: It will be sticky.)
- Using a pizza cutter or small knife, carefully cut the dough into gingerbread house shapes. (Note: You can roll the remaining dough to make new shapes.)
- Arrange gingerbread house shapes at least 3 inches apart onto prepared baking sheets.
- Bake cookie dough pieces for approximately 20 minutes until all edges are lightly browned.
- Bake chimney pieces for approximately 12 minutes or until edges are lightly browned.
- Remove from the oven, and allow shapes to cool completely on the baking sheets.
- Select a base for your gingerbread house.
- Using a squeeze bottle of icing to make them stay in place, carefully place the “front” of the house and one “wall” onto the base.
- Hold the two parts of the gingerbread house in place for a few minutes until the icing is partially set, propping them up as necessary. (See below for propping options.)
- With icing, repeat these steps to prop the other “wall” and “back” of the gingerbread home.
- Use icing inside and outside of the home as much as needed.
- Allow the house to set at room temperature for at least one hour before adding the roof pieces.
- Run a thick line of royal icing on the inside edges of one of the roof pieces, then put that side in place.
- Hold in place for a few minutes.
- Repeat the same steps to place the other side of the roof. Hold in place for a few minutes.
- Using your already-cut chimney pieces, follow the same steps from 15-18.
- Place your chimney on top of the house, using as much icing as needed if it doesn’t perfectly fit on the (cooled) gingerbread house roof.
- Allow the fully built gingerbread house to set at room temperature for three to six hours. (Ideally, let it settle overnight.)
- With a mixer (hand-held or stationary), beat the shortening and butter together on medium speed until creamy. Then, add the sugar, milk and vanilla extract. Beat on low speed for up to three minutes.
- Decorate your home with leftover icing, buttercream and candies as you see fit.

Baking Pro Tips To Successfully Bake the Gingerbread House
For sticky mixture: After mixing ingredients with a paddle attachment, always refrigerate for a couple of hours before rolling the mixture with parchment paper. This avoids it attaching itself to everything, and it rolls easier.
For curling dough: Let the dough cool entirely on the parchment paper or the counter. It may curl along the edges, so a flat surface is necessary.
For gingerbread house doors: Cut them out before refrigerating the house pre-decorations. Trying to carve doors later will usually result in the house falling apart. If you forget to carve a door beforehand, just use buttercream, icing or candy to create one.
For more precise cutting: Use a pizza roller instead of a knife to make the edges more consistent.
For balancing each side of your house: Lightweight objects such as pop cans, tall cups, water bottles or plastic bag clips may work. Be careful with chip clips though as they may pinch the cookie dough too hard.
For chimney assembly: If you assemble the chimney separately from the walls and the roof, it’s easier to place on top in one piece.
For frosting texture: If it’s too thick (after mixing with a paddle), add more milk. If it’s too sweet, add 1/8 teaspoon of salt.
For a strong base for your gingerbread house: If you use a piece of cardboard, make sure it’s not flimsy. A flat cookie sheet or a round baking pan is better. Smoothly line it with parchment paper or aluminum foil beforehand.
For more decorations on your house: While the fully assembled house is cooling overnight, cover and store leftover icing in the refrigerator. (While room temperature is okay, sometimes that’ll result in “melted” icing that’s harder to shape.) You can still do touch-ups later.
For walls and ends of homes that won’t stay in place: In addition to generously icing and patiently holding the pieces in place, make sure your movement from the counter to the fridge is not far. Ideally, you’ll use a countertop nearby. Avoid shoving the gingerbread house in the fridge. Make enough room so your gingerbread house can properly cool without the water pitcher or food items potentially falling on it.
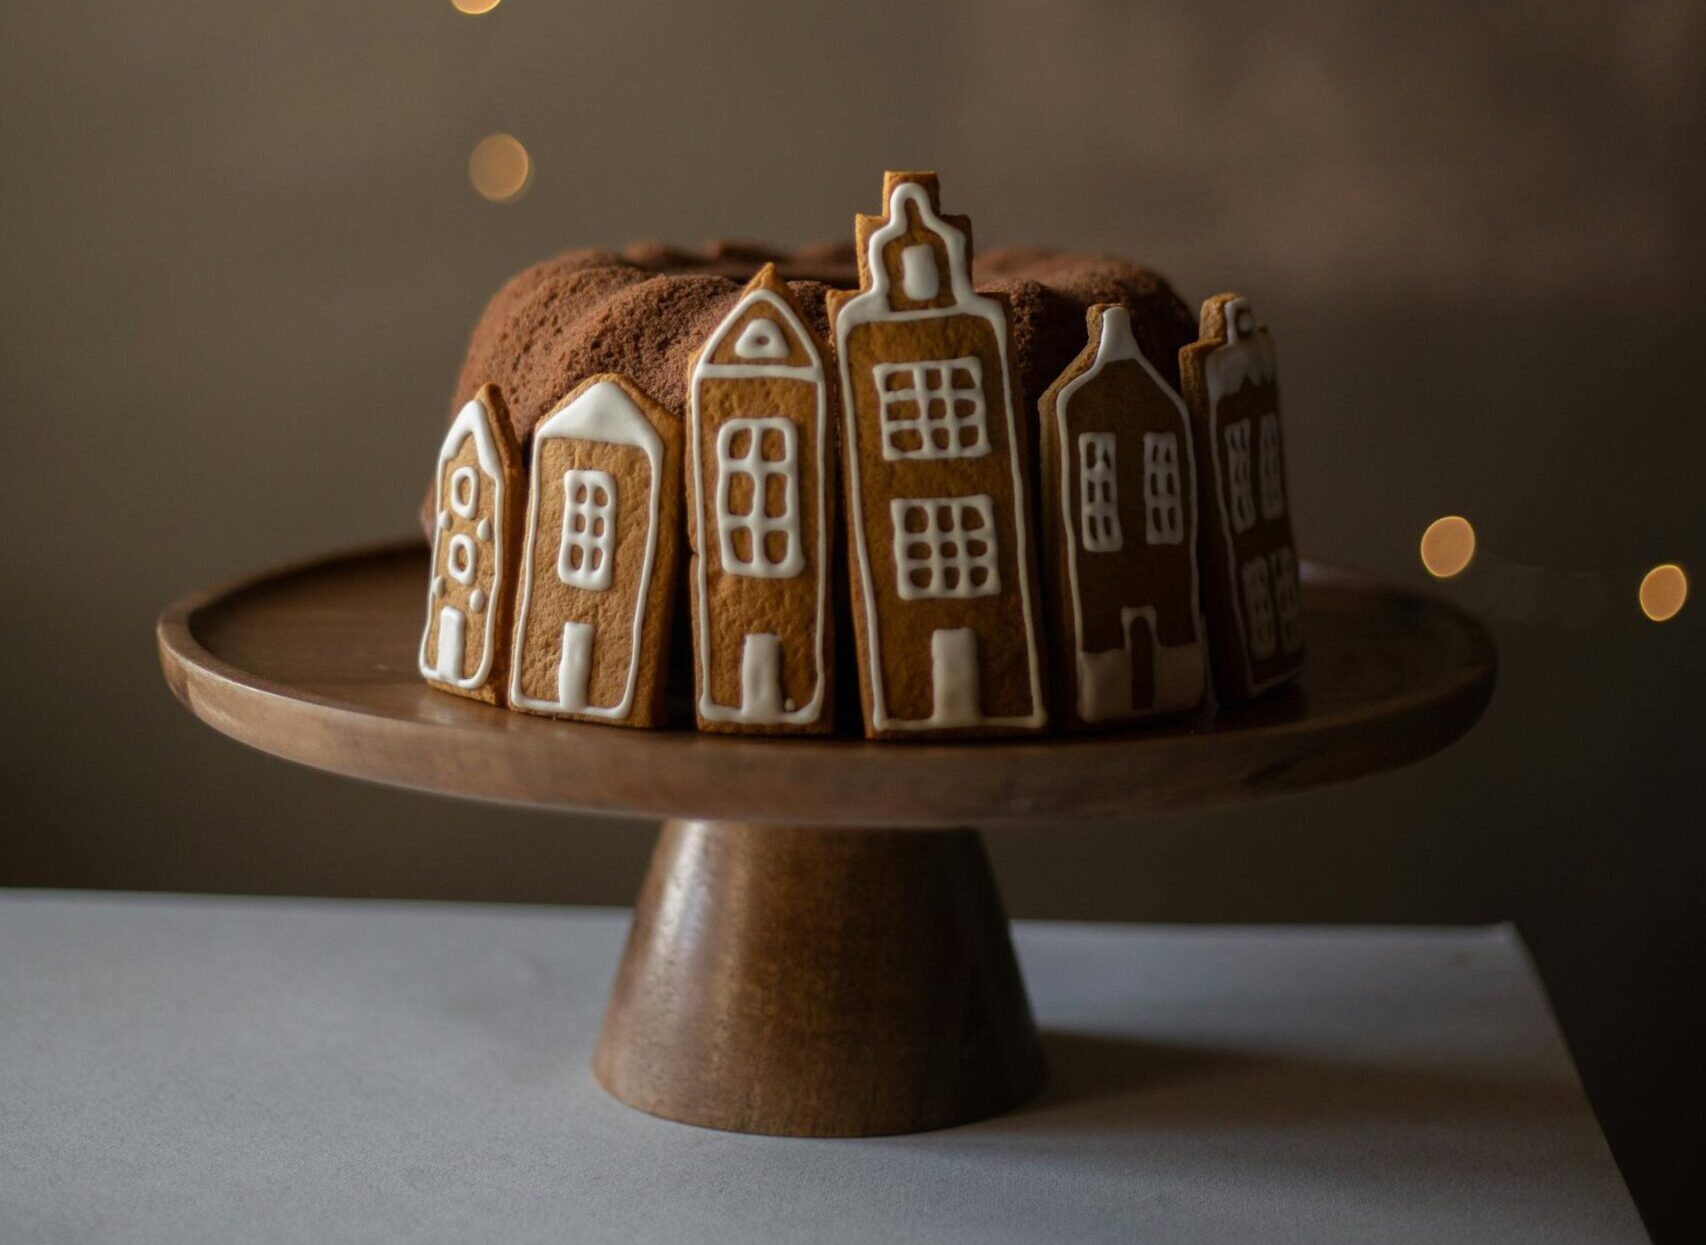
If all else fails and your gingerbread house is becoming a gingerbread house disaster, this gingerbread tent conjures up cool camping trips. Or, create your own little gingerbread homeowners association full of houses on a bundt cake. You make the rules. Your guests get to enjoy the cake either way.
Most Popular
popular posts
Easy and Delicious Pasta Casserole Recipes to Make Tonight
by Jessica Fields | January 23, 2025

Quick and Easy Fried Chicken Recipe Perfect for Busy Weeknights
by Stixx Matthews | December 13, 2024

Spaces
Whether it’s luxury or ease, every area of your home should be as fabulous and unique as you.

Organizing a Christmas Potluck? Try These 7 Party-Pleasing Options
by Shamontiel Vaughn | November 19, 2024

FOLLOW ALONG ON INSTAGRAM
#homeandtexture
Find us on social for more home inspiration where culture, personal style, and sophisticated shopping intersect to help you create a home where you love to live.