June 21, 2025 at 1:41 AM PST
Decorate Art Hanging Hack
Say Goodbye to Slanted Frames With This One-Step Hack
All it takes is a strip of painter’s tape to get perfectly aligned artwork.
Decorate Art Hanging Hack
Say Goodbye to Slanted Frames With This One-Step Hack
All it takes is a strip of painter’s tape to get perfectly aligned artwork.
June 21, 2025 at 1:41 AM PST
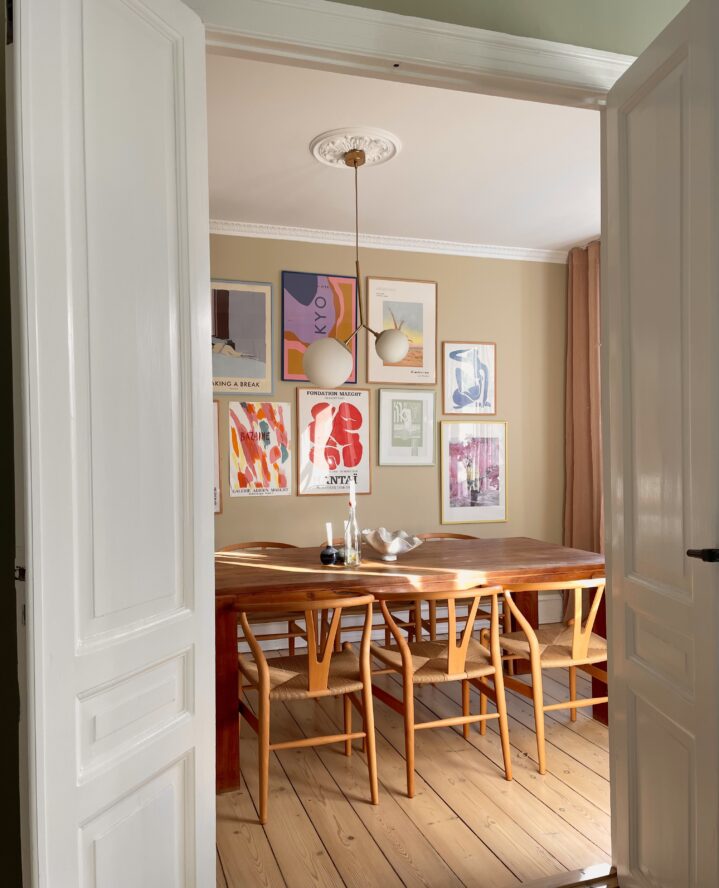
Have you ever spent hours trying to hang a picture frame only to end up with crooked art and multiple nail holes in your wall? The frustration of imperfect frame placement is a common household struggle. However, thanks to a brilliant hack shared by @clippercityhouse, achieving perfect frame placement has never been easier. This simple yet effective technique uses everyday materials to ensure your artwork hangs exactly where you want it, every single time.
The genius of this art hanging hack lies in its simplicity. By using painter’s tape to mark the precise hanging points on both the frame and the wall, you eliminate the guesswork that typically leads to misalignment. The tape serves as a visual guide, allowing you to level your nail placement before hammering and ensuring the frame will hang exactly as intended. This method transforms what was once a tedious task requiring multiple adjustments into a streamlined, one-and-done process that yields professional results.
Beyond solving the immediate challenge of hanging art, this technique speaks to a larger principle in home decoration: precision matters. When your frames hang properly, the entire aesthetic of your space improves. Straight lines create visual harmony, allowing the artwork itself to shine rather than drawing attention to crooked frames. This hack empowers homeowners to create gallery-quality displays without the need for professional installation services, making beautiful home decor more accessible to everyone.
@clippercityhouse My mind was blown the first time I saw this hack! I will never not hang pictures this way again #picturehanginghack #diy #tiktokhome
The Step-by-Step DIY Art Hanging Process
- Materials needed: painter’s tape, hammer, appropriate hanging hardware (such as nails or picture hooks), and a level.
- Step 1: Identify the hanging hardware on the back of your frame and place strips of painter’s tape directly over these points.
- Step 2: Carefully remove the tape from the frame and place it on your wall at the desired height and position.
- Step 3: Use a level to ensure the tape is perfectly straight. Adjust as needed.
- Step 4: Hammer your nails or install your hanging hardware directly through the marked spots on the tape.
- Step 5: Hang your frame, making sure it aligns perfectly with the tape marks before removing the tape.
Why This Method Works Better
Traditional methods of hanging art often involve measuring from the ceiling or using trial and error with multiple nail holes. These approaches frequently result in imperfect placement, frustration, and damage to walls. The painter’s tape method eliminates these issues by:
- Creating a perfect transfer of the exact hanging points from frame to wall.
- Allowing for easy adjustment before any permanent marks are made.
- Providing a visual guide that makes leveling straightforward.
- Reducing the number of holes needed to just one per hanging point.
Tips for More Complex Hanging Projects
This technique works beautifully for gallery walls as well. When hanging multiple pieces:
- Arrange your frames on the floor first to determine your ideal layout.
- Use the tape method for each frame.
- Consider using paper templates for larger or heavier pieces.
- Work from the center outward for the most balanced results.
Variations on the Basic Technique
You can adapt this method based on your specific needs:
- For temporary displays, use removable Command hooks instead of nails, following the same tape marking technique.
- For odd-shaped frames: Mark multiple points on the tape to ensure balance.
- For very large pieces: Have a friend help hold the tape in place while you mark and level.
The next time you’re faced with the task of hanging artwork, skip the frustration and reach for the painter’s tape. With this simple hack, you’ll achieve perfect frame placement on the first try, saving time, preventing wall damage and creating a professionally curated look in your home.
Most Popular
popular posts
Decorate
Access design inspiration that infuses personality and culture into your spaces.

The Ultimate Beginner's Guide to Styling Accent Chairs in Your Home
by Kaniya Rogers | August 12, 2024

CB2’s "The White Lotus" Collection Is Here—And It’s As Luxe As the Show
by Jessica Fields | February 20, 2025
Spaces
Whether it’s luxury or ease, every area of your home should be as fabulous and unique as you.


FOLLOW ALONG ON INSTAGRAM
#homeandtexture
Find us on social for more home inspiration where culture, personal style, and sophisticated shopping intersect to help you create a home where you love to live.