By Arielle Clay
January 19, 2023 at 10:16 PM PST
Furniture flipping is a popular hobby or side hustle for creatives looking for a unique way to express themselves. Scrolling through social media, it’s easy to stumble across a once pitiful piece of furniture that has been upgraded. If you’re feeling the creative itch and want to add your personal flare to your home, furniture flipping is an economical way to customize pieces exactly to your liking. Home & Texture is here with a step-by-step guide on how to flip furniture.
Diamond In the Rough
The first step in taking on a furniture flip, is to find the piece you’ll be restoring. There are a few popular ways to do this. Unfortunately, none of them are that easy. This is a hobby for those who love to hunt for hidden gems. One place to start your search is online. Facebook Marketplace is a great shopping tool for lackluster furniture in need of sprucing up. When searching on the site, look for sellers who are trying to get rid of items quickly or who have had a piece listed for weeks. It will be easier to bargain with these folks. As furniture flipping has gained popularity some sellers have taken note and will be firm in their pricing. Don’t fall in love with a specific piece. Be smart about how much you’re willing to pay and always keep in mind you’ll be investing additional money into the furniture you buy. Set a budget for this initial investment and stick to it. Craigslist is also a good shopping option although less user friendly than Marketplace. If you prefer shopping in-person, head to your local thrift stores such as the Salvation Army. Stores like these often have plenty of pre-loved furniture at a discounted price. Some even offer extra discounts depending on the day. Make sure to do a little research before taking your shopping trip.
Jump to Products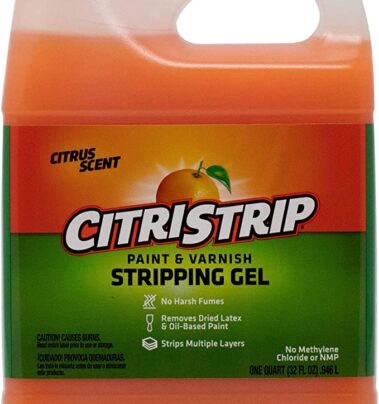
Once you’ve picked your piece of furniture and gotten it home, it’s time to get to work. Opinions vary on this next step, but Home & Texture recommends stripping any varnish or paint before you add anything else to your piece. Citristrip is an easy to use paint and varnish stripping gel that can remove dried latex and oil-based paint, varnish, lacquer, polyurethane and shellac. This stuff is powerful! It can strip multiple layers from wood as well as metal and even brick. The best strategy is to apply the citristrip in sections, cover it with plastic wrap, let it sit, then use a plastic scraper for removal.
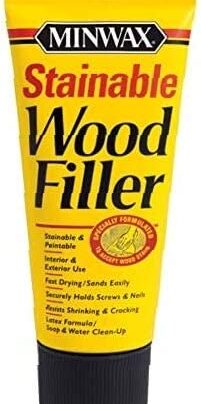
Not all pieces will need this step but since we’re talking furniture rehabs, it’s quite possible your project might. Wood filler is a simple way to permanently repair damaged and rotted wood. If you find yourself with a piece that has chips or holes in its surface, wood filler is the solution. To use, apply the filler to the problem area with the same plastic scraper you used for the paint stripper. Allow the filler to dry for thirty minutes before moving on to the next step.
Looking for some premium smart gadgets for your new home? Home & Texture’s got you covered! Our round-up of

Interior design is a creative and technical endeavor that requires an eye for aesthetics, knowledge of the latest

When you think of a summer getaway, you probably think of sun, sand, beach, and drinks by the pool. What if you could


A buttery smooth surface is ideal for painting. Before you add any color or stain to your furniture, first you’ll need to use an orbital sander to smooth out any imperfections. The sander will also be the last step for your wood filler, if you used any, and can help remove stubborn paint your stripper missed. Use a fine grit paper, around 120 to 220. Remember, you want to be gentle as overdoing it can permanently damage the piece. For smaller areas like legs, any detail work or tight corners you’ll also want to use a handheld sanding block. Once you’ve finished sanding make sure to wipe the entire piece down with a lint free cloth to completely remove all sawdust.

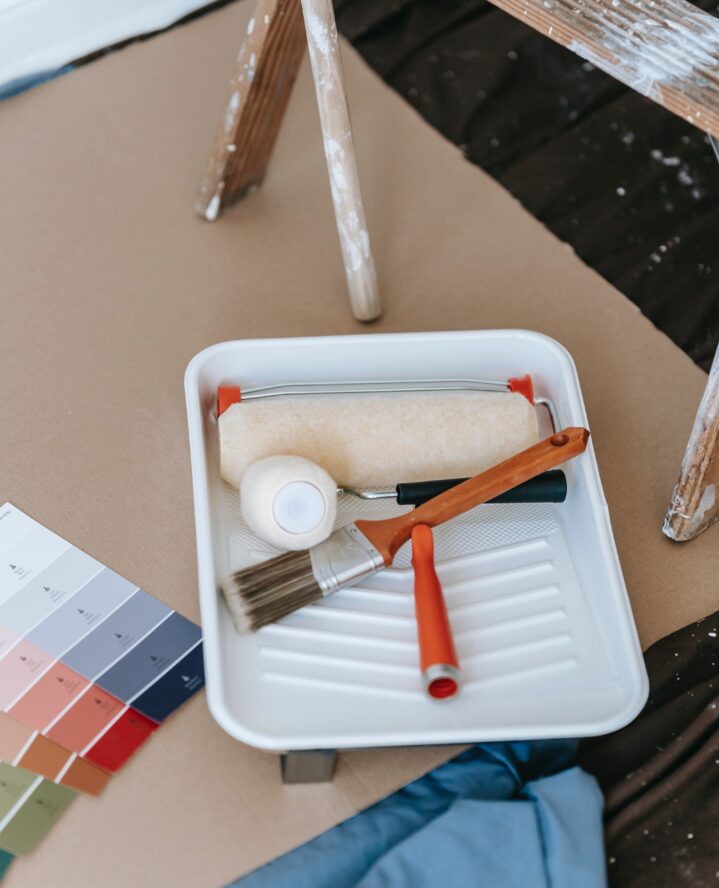
All the prep you’ve done up to this point should ensure a beautifully painted piece of furniture. You have many options when painting and if the item you’re rehabbing is smaller, a brush, paint roller or combination of the two should work well. If you have a larger piece such as a dresser or armoire, consider getting a paint sprayer. This sprayer is good for small projects. It allows you to use it anywhere in case an outlet isn’t easily accessible in the area where you're painting. Since you have less control when spraying, make sure to tape off every area that you don’t want painted. That includes any drawers and the back or underside of the piece.
Find us on social for more home inspiration where culture, personal style, and sophisticated shopping intersect to help you create a home where you love to live.