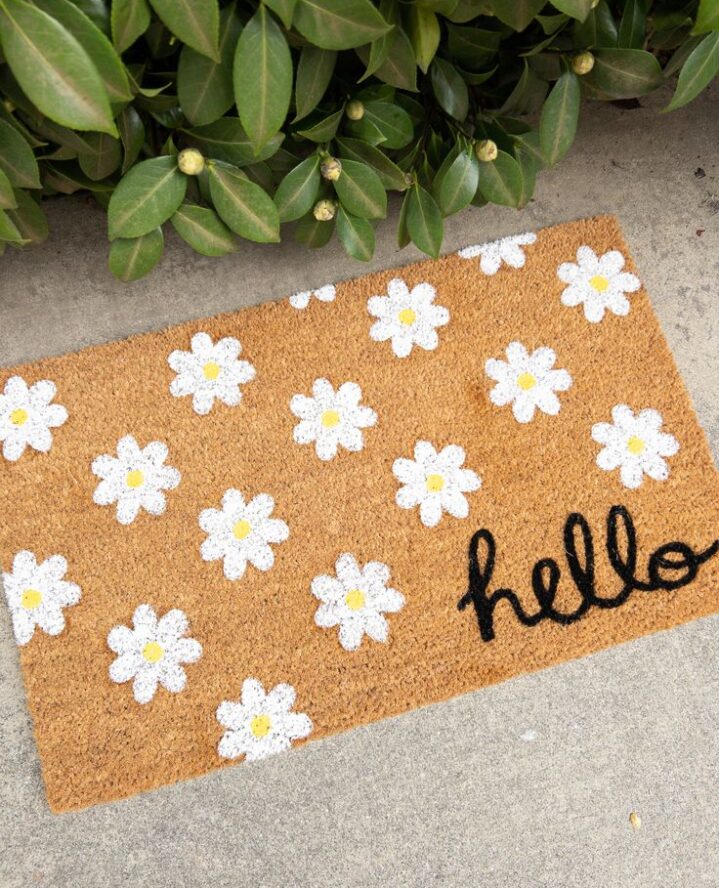
Outdoor decorations add a special touch of character, style, and functionality to your home. From the fresh florals that bloom in your planters to the lanterns that light up the walkway path to your front door, a well-decorated outdoor space shows your dedication to making your space cozy and stylish, even from the outside. One of the best ways to greet your guests through outdoor decor is by placing a doormat at each entrance to your home. And you can do it all on your own with this DIY doormat project.
Creating a DIY spring doormat allows you to express your creativity and be in control of the overall visual outcome. Whether it’s simple and plain or bold and colorful, you’ll have the say so. Keep in mind the look of the entry of your home, too. This will help you determine which doormat style or design best fits your space and aesthetic.
That being said, designing a doormat is easier, more affordable, and less time-consuming than you think. Here’s how to get started.
@eliza.lynne painting door mats for girls night!😍 i ended up doing the strawberries & the daisies🍓🌼 #homedecor #diyhomeprojects #painting #girlsnight #doormat #strawberries #daisies #diy #springdecor #summerdecor ♬ ready or not – senia
First, gather your supplies.
A Plain Vinyl Doormat
Go to your local home improvement store and grab a plain doormat. Places like Home Depot or Lowe’s will carry different doormats at an affordable price.
Acrylic Paint and Paintbrushes
Find acrylic paint colors of your choice. You should have an idea in your mind of what your doormat will look like and what it’ll say, so choose your colors accordingly and make sure they fit your current outdoor decor.
Adhesive Stencil and Stencil Tape (optional)
An adhesive stencil will help secure your stencil while you’re painting. The less movement, the better and cleaner your design will be. If your stencil doesn’t come with adhesive, you can grab stencil tape for the same purpose.
You can also make your own stencil using a craft cutter and other tools or order them pre-made. Small details like flowers, animals, and more will be great additions to your doormat. Make sure to create or order more than one stencil to help the overall design come to life.
Paper Plates
You’ll be using paper plates to hold your paint puddles. Dip and paint as needed and keep the messiness to a minimum.

Making Your DIY Spring Doormat
Now that you have all of your items, it’s time to get started.
Step 1: Prepare your station.
Grab your paper plate and squeeze the paint onto it. This will allow you easy access to paint as you go. Make sure your paint isn’t too close to touch or it’ll mix and create a new color (unless that’s what you want). To prevent further mess, use gloves to avoid paint from getting on your hands.
Step 2: Position your stencil.
Take your stencil and position it on your doormat. If it’s adhesive, try to position it the best you can for the perfect placement. Use your tape to secure the ends of the stencil to hold it in place.
Step 3: Paint your doormat.
Begin painting your doormat and remember to take your time. Have fun and use this as a time to relax. Use about 3-4 even paint coats. This will help the paint stand out from the doormat. Also, be sure to fill in every empty space with paint to create the sharp lines of each letter or shape.
Step 4: Let it dry.
Once you’ve finished painting, remove the stencil and let your doormat dry. If you notice any areas that could be filled in, now is the time to do touch-ups. Let your work dry completely before using it.
Repeat these steps for each personalized doormat and you’ll add the perfect spring touch to every entrance of your home.
popular posts
- 1It’s Black Business Month, So Let’s Go Shopping and #BuyBlack!
- 2These Home Decor Items Will Instantly Make Your Space Look Outdated
- 3Black-Owned Home Decor Stores To Support Across the United States
- 4A Look Inside Elon Musk's Tiny $50,000 House
- 57 Black and Multicultural Designers To Follow For Design Inspo

Unique Backsplash Ideas That Add Luxury to Your Kitchen
by Stephanie Taylor | January 19, 2023

These Candle Making Kits Will Elevate the Vibe of Your Home
by Arielle Clay | January 19, 2023

These 4 Mid-Century Modern Faucets Will Give You A Surge Of Inspiration
by Stephanie Taylor | January 20, 2023
Spaces
Whether it’s luxury or ease, every area of your home should be as fabulous and unique as you.

DIY Throw Pillows: These 5 Fabrics Add Both Texture & Culture
by homeandtexture | February 22, 2023
FOLLOW ALONG ON INSTAGRAM
#homeandtexture
Find us on social for more home inspiration where culture, personal style, and sophisticated shopping intersect to help you create a home where you love to live.


